Showing posts with label assignment. Show all posts

Tuesday, 19 November 2013

Mounting.

I had my ten portfolio shots printed through RGB Digital (as I had used them before and loved them) simply on glossy paper, and over the weekend decided that it was finally time to mount them. 

I had looked around at different places offering mounting services, offering the stuff so that you could do it yourself, but it was all pretty expensive - and I'll be the first to admit that I am a poor student. A job is only good so long as you are getting the hours you should be. So I went back to another website that I had used in the past and loved, FrameShop.com.au, to see what they could offer me. 

I had bought 3mm self-adhesive foamcore through this place many years ago, so I figured I could at least get that from there. So then wasn't I surprised when on their home page, they were offering six-packs of front mounting boards, pre-cut to your desired size? 

I ordered two of the six-pack mounting boards, at 11x14' to fit a photo at 8x10, along with ten 3mm thick non-adhesive foamcore boards, at 11x14 - all of this was ordered in white. What I received was all of my mounting boards, and twelve foamcore boards at 5mm thick. I saved $11 in getting those two free boards, and the 5mm foamcore is likely not to bend like my old 3mm has. So, I guess I can't complain! 

All up, including shipping to the Sydney metro area, this cost me $130. Not bad, considering the other prices that are out there. 

Once I had all of this, I just decided to stick everything together with double-sided tape. Honestly? So that I could re-use the materials if I wanted to. Because not all of those shots are fantastic, and I know I won't sell any of them. But I can use those materials to frame family photos are art photos to give as gifts, and then I feel like they're being useful.

Two weeks; four days; six classes; that is all we have left of TAFE for this year.

Thursday, 7 November 2013

Printing To A T-Shirt.

For my assignment, in which I used my image for The Angel Of Vengeance, I did end up printing onto a t-shirt. 

It was fairly straightforward, and cheap. I've had transfer paper sitting in one of my draws for several years, but the same product can still be picked up from anywhere around $20, and I bought two black t-shirts from a local store (they were two for $5). They had to be black, because my transfer paper was for dark fabrics. 

After that, I just followed the instructions provided with the paper itself. Slip a sheet into the printer and print the image onto said paper. Allow it to dry for thirty minutes. 

Take the t-shirt and place it on a hard service (not an ironing board!) and then iron it to make sure it's flat. Allow it to cool. 

Peel off the backing paper of the transfer, and place the image where you want it on the shirt. After that, you cover it with baking paper and iron it on for about a minute. (You never iron it without the baking paper, as this will damage both the image and the iron!) 

And that was that. 


My attempts were not perfect, but they weren't bad, either. Overall, I was very happy with the end result.

Tuesday, 29 October 2013

The Angel Of Vengeance: Printing.

Now that I have my third assignment basically completed (I'm still bouncing some ideas around about the look - I'm a little iffy with the background at the moment) I've been thinking about how I want to print it. My initial thought was an A3 poster, as I created the file in A3 and a poster seemed like a practical idea. But I don't have access to a printer that can do such a thing, and I want to be a little more creative. 

So I have two ideas that I'm dwelling on. 

The first is to use the gel medium from my wood-printing assignment to print the image on canvas. I haven't yet tested the way that this would look, and as I'd be printing A4 it would take quite a bit of calculating to make sure everything lined up properly and looked the way it was supposed to. I should also mention that the canvas I bought for this idea ended up being much bigger than A3, and I haven't been able to locate A3-sized canvas just yet. 

The second is to print onto a shirt. This was one of my very first ideas, before I even had my image, and Charles brought it up again the other day as a suggestion. I agreed that it was a suitable idea. I've had transfer paper for dark coloured shirts lying around for years, so maybe it's time I use it. I bought some cheap black shirts on the weekend (two for $5!) so I'll be giving that a shot sometime soon.

Tuesday, 22 October 2013

PORTFOLIO: Final Shots.

I took a step back from the rest of the world this evening and simply went through my live music shots, looking for those final ten that could make up my portfolio. 

It was a difficult process, because I'm so picky about my own work and there are very few shots that I truly consider great. I decided to make it simple on myself and pick out a few that I personally liked for one reason or another. I didn't consider orientation; I didn't consider quality. Because when it comes to live music, sometimes quality isn't key - it's all about getting the shot. 

Originally I wanted my portfolio to consist of five live shots and five musician's portraits, but I cut the portrait section of it because I didn't have enough that I was happy with. So I was just looking at live shots tonight. 

I tried to keep the black and white vs. colour battle even. In the end, I ended up with twelve shots that I'm considering - six colour, six black and white. 

The Final Countdown

I like this shot for a number of reasons. Firstly, because I think the rim-light is beautiful. Second, because I love that green light. Third, I love the girl's expression. You can tell that she is completely into the music and her playing. 

On the flip side, I don't know if this shot would be appropriate - taken out of context, it's not all that easy to see that she is a musician. 


I prefer this shot in 2:3, but I decided my portfolio was going to be 8x10, so I needed to crop it. Much like with the first shot, I love this because of the colours and the pose of the musician - he is completely focused on his music. 

I do not like the microphone stand in the left of the frame, but removing it isn't exactly easy - and in some ways, it feels wrong. 


Honestly, there's not much that I don't like about this shot - and I've shown it to the class before and they all seemed to love it, too. It is fairly timeless. You can't tell what genre the drummer is playing (seriously, I dare you to try!) and I will never get over the ghosting of the stick. It is something that I always aim to achieve in drummer shots. 

I am concerned with the way that this will print at the moment, but this shot is in for sure. 


This was probably the worst show I ever photographed, and it was hard for me at the time to find shots that I liked. But looking back, here is one I am semi-happy with. I like the simple pose of the singer and the fact that the microphone isn't covering up his face. 

I do not like the low quality feel of the shot. It is very noisy. 


Originally I had this one in colour, but I felt like the colour wasn't really adding anything. It looked better, more appealing, in black and white. This is a shot that I have always been happy with. It doesn't matter that it doesn't have the greatest composition and it's not entirely sharp - what matters is that I timed it perfectly, and got a shot that no other photographer at this show managed to get. 

I am fairly certain that I want to use this shot. 


I like the posing in this shot. To me, it is a classic guitarist shot - foot up on the amp, looking out at the crowd, playing something magical. When I showed this one to the class, I got some positive feedback. But mostly they just wanted to know what the tattoo on his neck was. (It's an owl, by the way.) 

I'm concerned that this shot might come out a little dark, and that it's very soft. 


I like this shot because it is simple but expressive. For people who don't know the band, it's just a rock musician doing what rock musicians do - giving the middle finger to the world. For people who are fans of the band, this photo can relate to a song whose lyrical chant declares, "Middle fingers up if you don't give a fuck." 

I am concerned this shot might not be appropriate? (Why do I feel like I'm still in high school? If we can handle artistic nudes, surely we can handle such "vile" hand gestures.) 


I like this shot because of the stick ghosting. That's basically it. I don't like the low quality feel of the shot and the fact that it's so noisy. 

I will most likely cut this shot. 


This was a good show for me. It was my first time shooting a venue with fantastic lighting and therefore the first time that I got live shots that were actually sharp! And that is why I'm so thrilled with this image. That, and the fact that the singer is so obviously into the song. 

I don't like that the microphone is covering half of his face. 


This guy is in the same band as the guy in the previous shot, so - same show, same great lighting, same awesome results. I like this shot because it's simple and expressive. I also really love it in colour, even with the tiny flare in the corner, because everything is warm and complimentary. 

I am fairly certain I will be using this shot. 


Same show as the last two, different band. I love the expression on this guy's face and the lighting in the background is gorgeous. My only complaint is that it's maybe a little busy. 

I am trying to decide between this shot and the next one. 


I like this shot because of the lighting, because it's sharp, and because the colour somehow works. I don't really like the fact that there's a microphone and a harmonica covering his face, but I do like that it shows how multi-skilled he is. 

And there we have it. The shots that I am considering. I'm thinking I might do some small prints of each in the next few days and see how they look in paper and ink.

Monday, 21 October 2013

Six Easy Steps: A Photo Essay.

One of the final three assignments we have is to shoot a photo essay while using the fill-flash technique. The photo essay was to demonstrate an how to accomplish an outdoor activity using six easy steps. 

My initial idea, offered by my brother, was to show the use of the family barbeque. But because of the recent fires there is a total fire ban, and therefore the barbeque didn't seem like such a great idea. So I decided on watering the garden instead. 


I'm not sure that I love my current shots, but at least I have something for if I don't get another chance to attempt it in the next week or so.

Sunday, 20 October 2013

The Angel Of Vengeance: Coming Together.

I've been working on The Angel Of Vengeance book cover/poster/whatever it is, and I'm liking the way that things are going so far. I took what I have so far to class on Wednesday, to ask Ben whether or not it would be suitable as my assignment, and he said I was on the right track. So that's a good thing. 

In the spirit of being more open with my work, like last time, here's some insight into what I have so far. 

These are the images that I started out with: 

Yes, even the text was a photo! I also used two pictures of the sky (with clouds) as the background for my image, but they're on a different hard drive and therefore not accessible to me at the moment. But every photo is mine, was taken by me, etc. 

Put together, here is what I have complied so far: 


I'm not quite ready to call it done yet, though I don't know what more I might be adding to it.

Thursday, 10 October 2013

The Angel Of Vengeance.

Have I mentioned previously that I might have an idea for the third part of my movements assignment, involving creating a poster/cover/something to do with a story that I am writing? Yes? Well, I am going to do it. 

I usually wouldn't post about this until after everything is said and done, because I hate to think of everything failing and me still having all this work up here as if things are going great, but I think it would be a good thing to put my planning here. It might motivate me to get things done, even if the first few attempts fail. So here it is - the first planning stages of my next assignment. 

I decided that I wanted to make a book cover/movie poster type thing for my current work in progress, The Angel Of Vengeance. I'm not going to bother finding perfect models for my characters - because let's face it, nobody's going to know the difference expect me! So this weekend I have my best friend coming over, and I'm probably going to end up using my two brothers as my two main male characters. (There is the potential of a third male character coming into play, and I have a co-worker in mind should this happen.) 

I have a general idea of how I want things to look, so I put my amazing drawing skills to practice and drew a mock-up: 


Gosh, what am I doing photography for?

Obviously, this isn't perfect. But it's an easy way of reminding myself how I plan for things to look. I also searched around on Google and found some images for inspiration, ideas, and for the way that I want things to look. It doesn't cover everything at the moment (because a lot of things are still just in my head, too) but I threw it all together and created a mini mood board: 


I want the image to be more dark than light, and I don't want the background to be distracting - which is why in the background inspiration images up there, we've got brick walls and smoke. 

Here's another thing I wouldn't usually do: give away spoilers, but in the spirit of noting down all of my idea-ing here... 

I want to try to create this image using only photos - as in, not artificially creating anything in Photoshop from scratch. It will be a challenge for me I think, but I'm up for it. Given the nature of the story, it's going to be interesting - so here are some ideas for how I intend to create the...crazier-looking things.

Zoe will potentially have lightning coming from her hands. Unsurprisingly, I've never managed to obtain a great image of lightning. I considered buying a plasma ball and taking shots of that, but then as I was walking to work on Tuesday morning another idea struck me. As I looked up into the trees, I was amazed at how much their branches looked like lightning strikes. And so I intend to use tree branches. 

Paris's hands were a little more difficult at first, but then the idea was obvious when it finally came to me - coloured smoke (or maybe just white, we'll see) and a sun flare or two. Again, we'll see how things go. 

Nathaniel has a force field surrounding him. When I first attempted a practice image on my brother, I followed a tutorial online that showed you how to make a force field. I didn't really like the look of it, but I figured it would do if I needed it. (I didn't save this image, so I sadly can't post it here!) But as I want to create this image now using only photos, I came up with a simple idea: shooting the rim of a glass. 

I also want to shoot a glass with a sparkler inside of it - both because it might create another interesting lightning shot, and because it might make for an interesting force field. 

If the third male character is included, he will be behind all of the others - looking back at the scene over his shoulder. 

This is obviously going to take quite a bit of work, and I don't have all the time in the world, but I have my hopes that it will work. If it does, then I'll tackle the issue of how I'm going to print it.

Wednesday, 2 October 2013

Assignmenting...Eventually.

The past few weeks have not been good to me. I've fallen off a ladder, contracted ringworm from a cat we rescued, and not completed anything productive that I had intended to. I have, at least, been thinking about my assignments - so that's a start, right? 

To Do
  • catch up on blog; 
  • bring workbook up to speed; 
  • decide on physical or digital visual diary - complete that; 
  • come up with ideas for photo-essay fill-flash assignment - shoot it; 
  • complete part three of movements assignment; 
  • finish portfolio - work out mounting. 
I've been thinking mostly about part three of the movements assignment, trying to work out what I want to do, how I want to do it, how I'm going to print it. For the most part, I get no ideas - except for one that I've had in the back of my mind, that I'm likely just going to go for. 

It's always been an idea I've had, but I've thought about it more and more since Ben asked me about it. I'm a writer - why have I never created any images to correspond to the stories that I'm working on? Maybe it's time I do that. The digital manipulation would come in because I write fantasy, but how would such an image correspond to a movement? I've already tackled modern surrealism. 

I've been thinking I'll just ignore the movement thing and go for gold. This is the last assignment - I want to create something I can be happy with. I might not be able to find the perfect model, but I can at least try to create a stunning image. 

Likewise, I'll hopefully be getting some more shots for my portfolio. I'm shooting Xavier Rudd at Big Top Luna Park, a venue that will at the very least have better lighting than the Hi-Fi. 

I'm hoping to get something productive done before heading back to TAFE next week.

Sunday, 11 August 2013

Printing Onto Wood.

As stated in an early entry, I decided that for my assignment I was going to print an image onto wood. 

Some problems that I expected to run into while doing this assignment were: 
  • most people said that you couldn't use an Inkjet printer for this process, but not having access to a laser printer, I decided to attempt using my Inkjet;
  • I expected to have trouble working out how much of the gel medium I was going to need to use; 
  • I expected to have issues with rubbing off the paper, because I felt I would end up rubbing off the ink as well; 
  • I decided to attempt this in colour, when I had only read tutorials for black and white - as such, I wasn't sure that the colours would come out, which would result in a very faded photograph or no image at all.
Let's start with the process. First, my equipment: a wooden box, white acrylic paint, Matisse Gel Medium, an Inkjet printer, a paintbrush, a roller, and my image. 


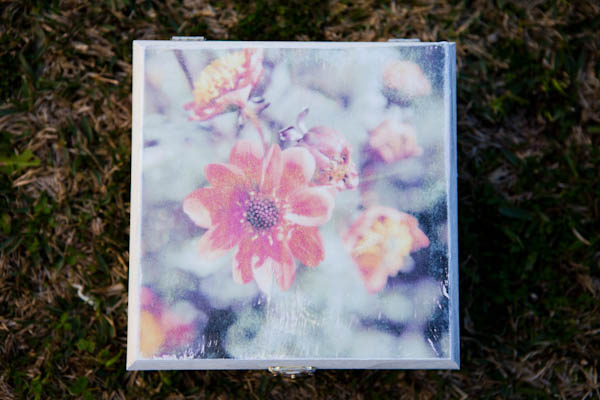
This was the photograph I chose to use for my assignment. It's a picture of my mother's dahlias, where I have edited the colours and sharpness to give it more of a pictorialist look. A soft focus and wider aperture were also used to achieve this.

These photographs showed my first attempt at this assignment, which didn't go quite according to plan, but is exactly the same as what I did the second time around bar one thing: the first time around, I painted the box in full before printing the photo to the lid. The second time, I only coated the top part of the box in paint. We will see why shortly. 


One everything was ready, I applied the gel medium to the top of the box in an even layer. The first time I did this, I used a medium sized paint brush and didn't take much notice of my speed. The second time, I used a larger paintbrush and did this quickly, so that the gel medium would all remain wet before the image was applied. 


Once applied, the image and the gel medium were left to dry overnight. Once it was done, I ran the paper under running warm water and began to peel away as much as I could. 

The first time I attempted this, this was where things started to go wrong. I didn't know that acrylic paint became slippery and began to come off once it was wet. As such, I ended up getting paint all over my hands and my image began to rub off in places that I didn't want it to. 

The second time, the rest of the box was paintless while only the side that held the image had been painted. I also used cold water this time, and achieved the effect I was after. 

Overall, I am very pleased with the way my assignment came out: 


This was finished by applying acid free Mat Spray to the image to protect it.

I quite enjoyed this, as it was both fun and rewarding. I can see myself doing this a lot in future, as such things make for great gifts. Overall, it didn't cost too much either. From the Riot! arts and crafts store that I got all of my materials from, I spent $10 on the box, $10 on a container of paint that still has most of its contents, and $15 on the gel medium while is also still mostly full. Paintbrushes were pre-owned and the roller was $2.

Thursday, 18 July 2013

Printing Onto Wood.

After my last experiment with using an inkjet printer to print onto contact paper failed, I figured I would give using an inkjet printer to print to wood a go - it seemed like an interesting thing to do, given that a majority of tutorials and blog entries I found said that it wouldn't work.

I found a YouTube tutorial where the creator said that she and her sister both used an inkjet printer. Much to my surprise, it was basically the same as every other "don't-use-an-inkjet!" tutorial I had seen: apply a gel medium to the wood, place the print ink-side to the gel, let it dry over night, then remove the paper under running water. 

Obviously, I had my doubts. 


For my test run, I didn't bother leaving it overnight. I let it dry for a few hours and then started the process of removing the paper. As a result, some of the gel medium hadn't dried properly. I ended up rubbing some of it off and getting holes in my image! 


I let the wood dry a few times, and always felt like I still hadn't removed all of the paper. Even now I'm not so sure that I've removed all of it, but I do think that it leaves quite an interesting effect. And either way, I have achieved using an inkjet printer to print on wood! 


The next step is to take a photo to use for this assignment, and then to print it to my wooden box. At this point in time, I'm leaning towards pictorialism as a movement, because printing to wood gives some lovely, old-looking effects that will go well with this.

Sunday, 7 July 2013

Inkjet Printers and Contact Paper.

Although I haven't decided on a photo for it yet, I've been thinking on part two of the assignment and decided that I either want to print on glass or wood - because I love the look of both. 

The catch is that I didn't want it to be expensive, and it needed to be something that I could do at home - so the collodion method was out of the question. With that said, I came across a tutorial that would essentially enable me to make a sticker out of one of my photographs, so that the sticker could then be applied to glass. 

Not exactly printing on glass, but it looked like fun regardless. 

The only problem was that these prints need to be made using a laser printer, as those use toner instead of ink. I decided I would try with my inkjet anyway - I don't currently have access to a laser printer, and I wanted to see if inkjet would work anyway. 

It didn't. 

I printed a high contrast black and white photograph onto plain paper and then stuck a sheet of clear, self-adhesive contact to it - with the ink side of the photo meeting the adhesive side of the contact. I let it dry for a while and then put it into warm water, where I then left it to soak for ten minutes. 

After that you're supposed to rub the paper off the contact, and the photograph is supposed to be left behind. But for me, the ink simply washed away and I was left with a blank sheet of contact paper. 

I plan on trying it again when I have access to a laser printer, but my next experiment will be with wood.

Saturday, 18 May 2013

Keep Your Head On.

Instead of completing three different photo essays over the course of the year, we were told that we would instead be assigned to cover one of the opening nights of the Head On Photo Festival. 

From my perspective, this was a good thing. Not only was it getting us away from the dull briefs that we had been fulfilling since the beginning of our first year, but it was also giving us experience and throwing us head first into the industry. A real job in place of three ideas presented to us by our teachers - it sounded like a good idea to me. 

It didn't hurt that I felt I was on top of things. Since I shoot concerts, I'm no stranger to low light situations where your subject never stands still. I thought I had a pretty good idea about how to handle low light. If anything, shooting the open night should have been easy - the light would be unchanging and much more concert than the spotlights you get on a stage. 

But last night was nothing like I expected. 

I think I covered the three briefs I was given well enough, but I still feel like the night was a failure to me personally. 

Shooting shows is easy - you get there, and you know that your subject is up there on the stage. You don't need to know names; you don't even need to know faces. You don't need to speak to anybody - you just need to shoot.

But last night was nothing like that. I knew it was going to be a little more difficult going in - that I was actually going to need to speak to people and find things out - but I was nowhere near as prepared as I thought I was. And I'll be damned if my old timid tendencies didn't come back right at the moment that I needed them the least. 

When I got there, I spoke to the three people who were sitting at the front desk and did what I was supposed to - introduced myself, explained that I was shooting and asked if there was anybody I should know. They weren't entirely sure themselves, but they did describe what the Head On representative looked like. Her brightly coloured shoes would be hard to miss. 

After that, the little bit of confidence that I'd managed to scrounge up before walking in pretty much vanished. I took some shots of people, some long exposures, some detail shots, but eventually I started to panic a little. I felt that I didn't know what I was doing. I felt that I wasn't doing things right. 

But as the night progressed, things got better. My confidence started coming back. My shots started getting better. I grew more comfortable in my surroundings and took the shots that I thought I would need in order to fill my briefs. And then I let the gig photographer in me take over and just took photos of whatever took my fancy. 

Overall, the night wasn't a huge success. I screwed up a lot, but the important thing is that I know. So next time I can do better. 

And I have to keep reminding myself that it could also have been a whole lot worse. Being at the main opening, and at the TAFE of all places, I had classmates and teachers all around me, helping me out and encouraging me every step of the way. They, along with my best friend, are probably the main reason that I finished the night feeling more like a professional as opposed to the lost child I had felt like when the night began. 

But from this event, I can also say that I know for certain I'm not a huge fan of these sorts of jobs. I'll stick to concerts, and to weddings. Because in a way, those two things are similar - you go in knowing exactly what shots you need to get, who your main subjects are, and the lighting is unpredictable. 

That makes me sound crazy, but I suppose we like what we like. 


Sunday, 12 May 2013

Linger: Some Final Thoughts.

Today I printed my assignment. Right from the start I knew that I just wanted to do a simple print for my first assignment, both because it would be easier and at this point in time it is just more cost effective for me. I would leave more interesting presentation thoughts for parts two and three of this assignment. 

I printed my black and white photo on some Ilford Galerie Smooth Lustre Duo instead of the usual glossy papers that I would use, because I might preferred the look of the smooth lustre. For presentation to the class, a bigger size might have been better, and I feel I've let myself down by not thinking of this beforehand. This is something to keep in mind for future assignments.

I have permission from both of my models to use my shot for portfolio work. As this was all that I needed it for, that was all that mattered to me.

What would I do better next time? 

Honestly? Everything. I didn't get the exact shot that I was hoping for, so next time I would do more than one photo shoot with the same model. I would do the first shoot, look at my shots and decide on what needed to be changed, then do the second shoot - and keep going until I got exactly what I was looking for. I would also remember to take my shot-list with me to the shoot, because I feel that this would have helped me greatly. 
In terms of the photograph itself, next time I would choose a better location, use a later time of the day, and use either fill-flash or a reflector to get some more light into my model's faces. I feel that this is where I lack in a lot of my portraits - I can just never get my outdoor lighting right, and my subjects always seem to lack the light and contrast that I'm always after. 

As already stated, in terms of printing I would print bigger than the A4 shot I have now, and perhaps print on canvas. Canvas is something that I haven't ever printed on, though I absolutely love the look of it.

Saturday, 11 May 2013

Linger.

This morning I had the photo shoot with Gabby and her boyfriend - and despite thinking that I was as prepared as I could be, I still managed to forget my shot-list at home. Sadly this meant that I only made half the shots that I intended to, but I still managed to get one that I'm fairly happy with. 

Although on occasion I'm still tossing up between this and the previous shot of my best friend in the cemetery, this is currently my final shot: 


My original idea was to have a couple, one of whom was a ghost - young lovers who were separated before their time. The girl might have died in a car crash or some similar, tragic circumstance. I pictured her, transparent and hardly there at all, reaching out to comfort him from the grave; him staring into her eyes, knowing she was there - feeling her, even if he couldn't see her.

That was this shot: 


It didn't turn out quite how I pictured it, so I didn't end up liking it all that much in the end. If I were to shoot it again, I would definitely have them further away from the bush - to render it out of focus and have it less distracting, and maybe have them standing - shoot from the waist up. Definitely make it more intimate. I don't feel that the story really came across here, and that is important to me. 

So back to my final shot. It had the same story behind it, originally - the girl was dead and the boy was mourning her loss. In this one, he definitely didn't know that she was there, watching over him while he stared into the distance. But when I look at the shot now, I see a different story. I see a murderer being haunted by one of his victims - though he doesn't quite know it yet. It's the beginning of a horror story. 

To achieve the way that she looks like an apparition, I used a double exposure. 


As you can see, there is one shot with Gabby in it and one shot without. With my previous assignment attempt, I layered the photos together and simply lowered the opacity of the one with my friend until I got the result that I wanted. But with this one, I didn't like the way the shot looked when Gabby was completely faded.

So for this shot, I layered the two photos together and then used a layer mask to erase the parts of the top photo that I didn't want - a gradient was used to give Gabby's legs their faded look.

I prefer the photo this way because I like that at first glance, people might not notice the oddity. And in horror stories, that is quite often how things go - you don't realise that the ghost is a dead person right until the end, when it's already too late.

Friday, 10 May 2013

The Double Exposure.

Before I even knew what they were, double exposures were always an interest of mine. I loved the way that people could have two images overlapping and still have the form a beautiful, interesting photograph, and it was something that I had always wanted to try. But up until now, I never had - and that was why I wanted to use a double exposure for my first assignment. 

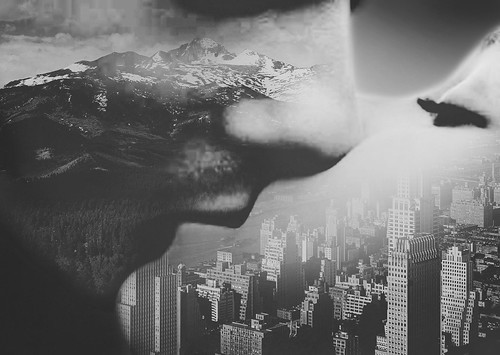
This photo is one that I loved at first sight, and I can still never get enough of it - because it shows both fantastic technique and a flare of creativity. I also love that although there is a lot happening in the image, it still manages to stay clean and composed.

Untitled
Jeen Na on Flickr.

With the digital age, double exposures have become less common - both because in the days of film they were quite often happy accidents, and because with digital it is not as easy to achieve them. Whereas with film all you needed to do was roll the film back and take a second shot over the first one, with digital it requires going into Photoshop or other such programs and messing with opacity. Many people never bother to experiment with it.

Going with my theme of loving fantasy novels and wanting to get more into taking shots that look like they've come out of a fantasy world, I came up with a story behind a set of new shots that I want to get this weekend when I work with my friend and her boyfriend.

I want these shots to look both real and surreal at the same time, and I'm hoping that I can achieve that. 

Sunday, 5 May 2013

Ethel.

Yesterday my friend and I took an afternoon trip to Rookwood Cemetery so that I could attempt to get a decent shot for my assignment. 

My idea was simple. I wanted her to be a ghost, lingering behind in the cemetery even after she was "gone" from our world. So we traveled around to different sections in search of the perfect lighting and the perfect setting. 

The first shot I took was one in the Russian section of the cemetery; she was standing in a gazebo-type monument, and you could see all the graves behind her. But in the end, the shot just didn't work for me. The atmosphere was all wrong, and it was far too bright. 

Another shot I did was of her walking towards me between two rows of graves - so she wasn't attached to any one of them in particular, she was just "wandering". I feel that this shot might have been acceptable to me if only the two rows of graves had been closer together. As it was, the photo had too much sky, too much grass, and not enough subject. 

It was the middle shot that worked for me. 

To me, the atmosphere here feels right. She looks sad, she looks somewhat lost, and we even managed to find a girl's grave where the age was right - Ethel Francis died when she was twenty-three. The only thing off here is that she died in 1908, and my friend is clearly dressed for the twenty-first century. 

The process for achieving this photo is simple, but effective. I took two shots of the grave - one with my friend in it, and one without her in it. Then I layered them over the top of each other until they were perfectly aligned and lowered the opacity of the layer that contained my friend. The original shot had a washed-out sky, so I also added some more interesting clouds. 

Obviously, this wasn't exactly the shot that I had in mind. I couldn't find anybody else to model for me, so I only had my friend to work with. 

But even after the shot was done, I kept playing with the idea. And now I have another shoot scheduled for Saturday with another of my friends and her boyfriend, so I'm going to spend some time really planning out that shoot, looking for a location with the perfect light and fine-tuning the idea. Hopefully I will come up with something better - if not for this assignment, then for my portfolio at the end of the year.